Making a Game in Unity
Project Information
Description: Students will follow along with the tutorial to setup the Unity game engine and create a game demonstrating different concepts and methods useful for game programming.
Learning outcomes:
-
Students will create a simple game to demonstrate understanding of the Unity Engine.
-
Students will write basic programs to show knowledge how to do basic scripting in C#.
-
Students will be able to design a simple game through Unity.
-
Students will understand the basic theory of game design.
Estimated Time: 5 Hours
What students will need:
- A computer that can install and run the Unity game engine (Most Can)
Procedure for User Study
If you are participating in the user study, then these are the instructions for going through this tutorial. If at any point you do not want to continue the project, you are free to stop working on it. Then you go and complete the post-survey and are done with
- Read through the tutorial.
- Follow along with the instructions. a. For this project, creating a simple game in Unity similar to what is shown in the tutorial is considered completing the project.
- Feel free to make note of any parts of the tutorial that were unclear, or you wish provided more or less detail.
- Once you have either completed the project, or you wish to be done, you can complete the post-survey to finish the user study.
- After the completion of the study, you are free to continue working on your project in whatever capacity you want. That work is not part of the study.
Introduction
Goal of the Project
This tutorial will introduce game development through Unity and C# Scripting, provide the knowledge to make your own game. Unity is a powerful game engine capable of developing all manner of video games. Whether you are making something small for a game jam, or part of a team making fully fledged multiplayer games, Unity has the features and capabilities you need. The programming language Unity uses, C#, is a powerful and modern object orientated language with capabilities extending beyond Unity.
This tutorial will first explain the layout and concepts of the Unity Editor and C# scripting then split into sections for each important step of developing a very simple game. In each section there will be a video showing how to go use the Unity Editor to accomplish the task, which already has completed C# scripts. After, there will be an explanation of each script, building up the logic and showing what that script looks like.
Prior Knowledge
No knowledge of Unity / Visual Studio is needed, and neither is any knowledge about C# scripting. Although not necessary, experience or understanding of coding or game design theory is useful for understanding these topics.
Game Demo and Pre Made Sprites
Folders containing the Sprites used in the game and an example download
of a game (where the application is the middle file) can be found in the
google drive folder linked below, along with a document walking through
the download of Unity and a zip folder of the two folders mentioned above
if needed.
Link to Google Drive Folder
Installing Unity and Visual Studio
If you do not have Unity or Visual Studio installed, you are going to want to install the latest versions of Unity Hub and Visual Studio. Unity Hub acts as a medium for installing the Unity Editor along with accessing content provided by other users. Visual Studio is an excellent programming software that Unity integrates with to edit code and create scripts for your game.
Understanding the Unity Editor
Before starting your project, it is important to have a basic understanding of Unity and how to use the editor. However, the bulk of your understanding will come from creating your game and testing things out to figure out how it works.
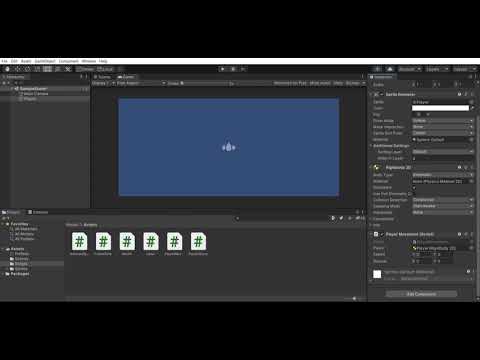
The Unity Editor
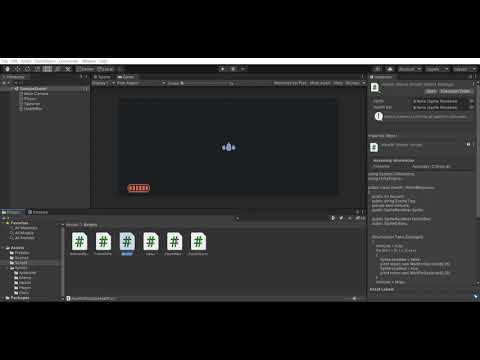
This is a screenshot of what the Editor generally looks like
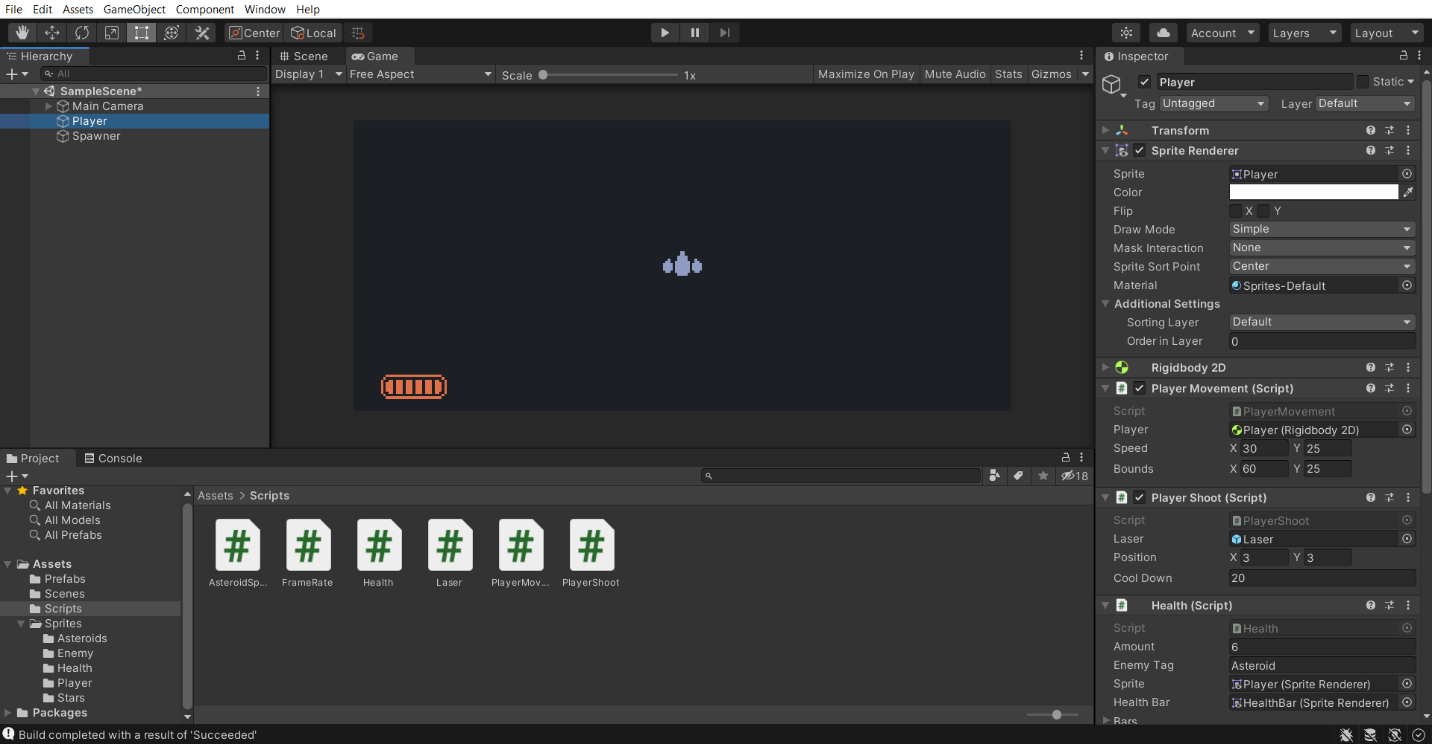
As you can see, there are four main parts of the screen
The Hierarchy (Upper Left)
This part shows all the objects present in the game scene at that moment. This could include the camera, the player, random objects like rocks, enemies, etc. It also displays the relationship between the objects. For example, the children of an object might be tied to the object so that they follow as the object moves.
The File System / Console (Bottom)
This part displays the files in your game such as images, programs, or useful tools the editor needs but you do not really need to worry about. The file system is useful for organizing the files used by your game. The console acts is where you can find errors displayed, as well as any other messages created by the code as it runs. This comes in use when you are debugging your code.
The Game / Scene (Middle)
This displays what your current scene looks like. It allows you to move objects around, scale them or edit components of them. It also displays your game when you run it so you can play it as you build it.
The Inspector (Right)
This part allows you to add components and scripts to a game object, set variables, position objects by coordinate position, and much more. It allows you to modify variables in your scripts before and during running your game.
Important Concepts
Game Objects
Game objects are a core concept in Unity. Essentially, everything that is in a game is an object or a clone of an object. All code that is run must be attached to a game object. Examples of game objects might be the camera, a light source, a background image, an enemy, or any other entity that is part of your game. All game objects have a Transform component which means they have a position that can be set in the X Y and Z axis, a scale on each axis, and a rotation around each axis. Game objects do not even have to be visible; some are there purely to run code. Values used in your script, such as player health, or ammo count, can be changed in the editor or through scripts.
Game Objects that are children of another one (placed inside them in hierarchy) will have a transform value relative to the parents instead of space around them (so 0, 0, 0 will end up at parents position)
Components
These are additions to game objects you can add that handle various things not every game object might need. For example, the Sprite Renderer component allows a game object to show an image in its place. The BoxCollider component allows a game object to physically interact and collide with other game objects with a BoxCollider component or detect when overlapping with another game object. Components are a powerful system that allow you to add new behavior to game objects without requiring every object to have that functionality, and without the need to copy code between objects.
Scenes
These are the way to have different levels in a game. They are built separately from each other and cannot interact with each because only one scene is able to run at a time, usually. Using scripts, you can switch between scenes, which will stop and reset the current scene, and then load the new scene.
Variables
Variables are the most basic and common way of storing data. A variable can be any kind of data. Variables have “types” which describe what kind of data they store. Variables can store things like a number, word (called a 'string'), component, or game object.
There are multiple ways to represent numbers with a variable too. Depending on the accuracy and memory you want it to have. The most common ones are integers (numbers without any decimals) or floats (numbers that can have decimals and are indicated with an ‘f’ at the end)
A variable will usually look like this when set outside a method:
Public Type Name (Can be accessed anywhere in the game)
Private Type Name (Can only be accessed in the script)
Static Public Type Name (Accessed everywhere and all instances are the same)
And like this when inside a method:
Type Name (essentially private since it is only used inside the function)
Type could be something like integer or string, etc.
Access modifiers are the first part of these lines, the public, private, static ones which tells the system who can use that variable and how it can be stored. A public variable can be used anywhere in your system. Inside its class it can be used however, and outside its call it must be called as a child of that class.
For example, in the class Animal you have a public variable Hair. In the class Animal you have some functions that use this variable and can call it as Hair. But another class Animal2 wants to call the variable Hair, so it must get a reference to the Animal object and then it can call the Hair variable like Animal.Hair. This is how you call a variable or function from a class, by placing a perioid after the class then the variable you want.
A private variable can only be used in the class it is defined.
And a static modifier is applied to a public or private variable so that each instance of that variable represents the same varaible, which does have its uses. For example, let's say we have an Enemy AI and each one needs to find and store a variable for the player's position. Each one could calculate it, or you could use a static variable to represent the position so only one enemy needs to find it and the rest will have the variable updated automatically.
With unity, any public variable can be set in the editor to initialize it when the game starts. Static or private ones cannot be set. Although there is a way to force Unity to let you set them by adding [Serialized Field] above each definition, although that is a very rare optimization.
Methods
A method is a funciton that can take some variables as input, if any, and return something, if anything, after running some lines of code inside of it. There are some premade ones like Start (which runs its contents once at the start of a game) or Update (which runs its contents each frame of a game) or functions you define on your own which are handled based on how they are called in your script. They can also return a value such as a number or a component or even nothing (void). This is the Start method which takes no input and returns nothing, simply runs whatever code is inside of it once.
void Start() {
    // Code Here
}
This is an example of another method which returns true is its input is greater than 10, otherwise it returns false. These are boolean (bool) values (true or false):
bool Method1(int Number){
    return Number > 10;
}
Scripts
This is a crucial part of unity. A script is code that you write that
can become a component for game
objects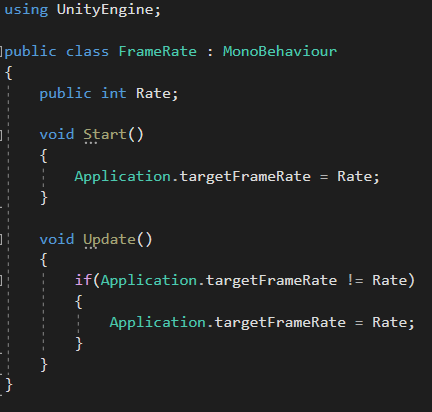
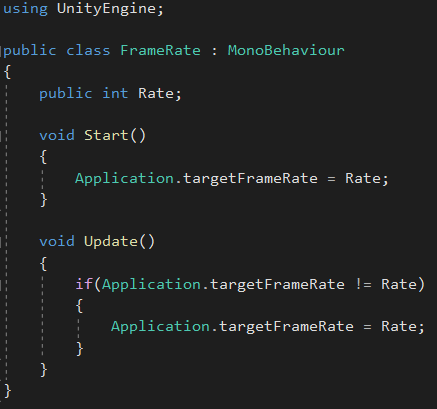
Here we have a script ‘FrameRate’ which represents a new Class under the same name. Any object with this script will have an instance of this class as a part of it.
It has a reference to the UnityEngine up top which means it will be using functions or variables or classes in the Library called UnityEngine.
And it has a call to MonoBehavior next to the class, which means the FrameRate class will inherit some actions from the MonoBehavior class. This is simply a way for Unity to make sure the classes are dealt with correctly when instantiating objects or destroying objects to make sure there are no errors. It is not needed for scripts that will not be attached to objects, basically ones that are just used to store variables across scenes, which you wont need to worry about.
In this class we have a public variable Rate which can be set in the editor or in any of the scripts as long as a reference to the instance of the script is made.
It has the Start method which means it will run whatever code is inside it once for the frist frame it is active, where it will use the Rate variable to set the frame rate of the game.
Then in the Update method, which runs for each frame of the game, it checks if the frame rate has changed and then sets it back to the Rate
Both methods and the public variable are in the same scope, which is a common term in programing that means they were defined in the same place, in this case insode the class definition but not inside anything else. This means that anything in the same scope or inside any functions in that scope can call them without needed a reference to the class.
Setting up for Your Game
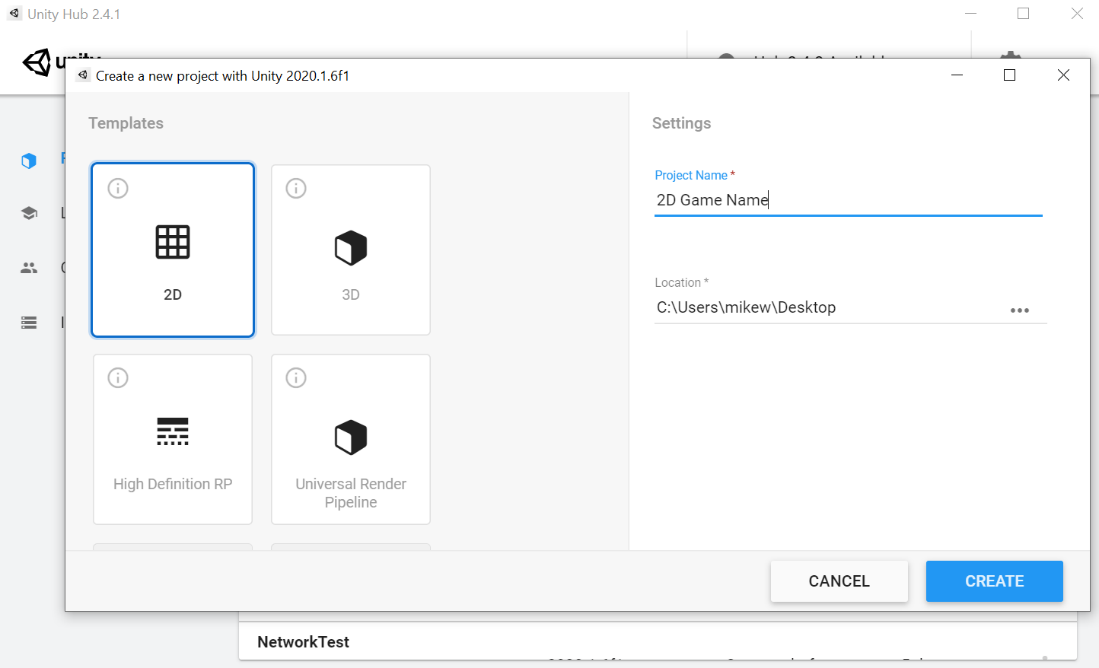
Create a New Project
Now that we have covered the basic background information, we are ready to start making something in Unity. We will be making a simple 2D game so you can start by clicking new and making a new 2D project, give it a name and choose where to save it. Exactly where you save it to is not important.
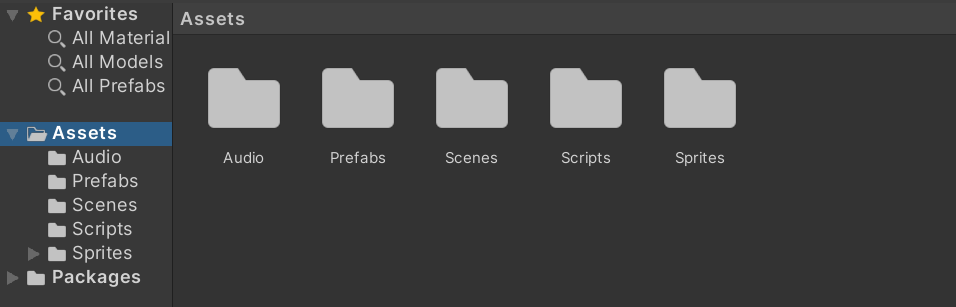
Folders
The first thing you should do if you want to stay organized is to set up several folders to divide your assets into. Four standard folders for a simple game like this one would be Scenes (which should already exist), Sprites, Scripts, Prefabs. Audio is not necessary in this case. Right click on open space in Assets or click the + to the left while in Assets to add the folders.
Making Your Game
The Player
The first essential part of making a game is setting up the player controls and making sure it feels right to play, we will start by making the game object for it.
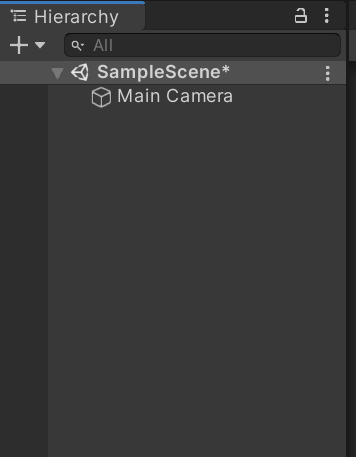
To add a Game Object into your scene, there are a couple methods:
-
Click on the + to open a drop down menu, or Right Click in the open space below the Main Camera.
-
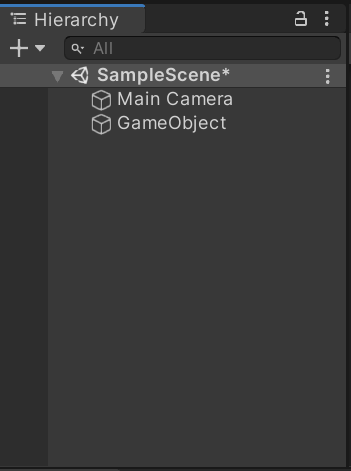
In this menu you can select either Empty Game Object, or select 2D Object then select Sprite.
-
You can also open up the GameObject menu at the top of the screen for the drop down menu.
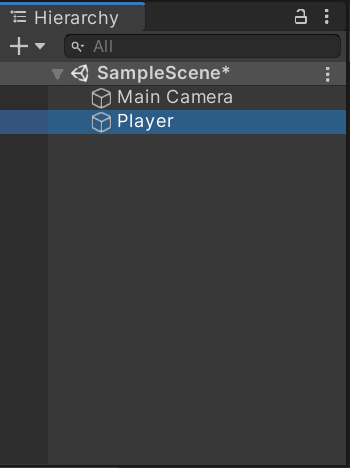
-
Clicking on the new Game Object after already clicking it (Highlighted Blue) will allow you to name it whatever you want to distinguish it >within the hierarchy.
-
Selecting 2D > Sprite will essentially make an Empty Game Object but with a Sprite Renderer already attached to it.
-
Always Remember to Reset the Transform component of a new Game Object (sometimes start off as random values)
Player Components
Now we just need two components to make the player movement:
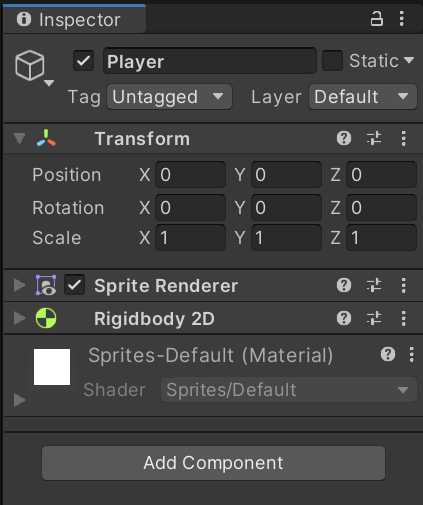
-
Sprite Renderer - This simply displays an image for the object.
-
Rigidbody2D - This allows you to apply physics to an object such as velocity in 2 Dimensions.
To add components to an object you can click on the player object in the hierarchy or in the scene view, then look over to the right in the Inspector.
Then you can press the button 'Add Component' and search for Sprite Renderer and Rigidbody2D and add each of them to the Player object.
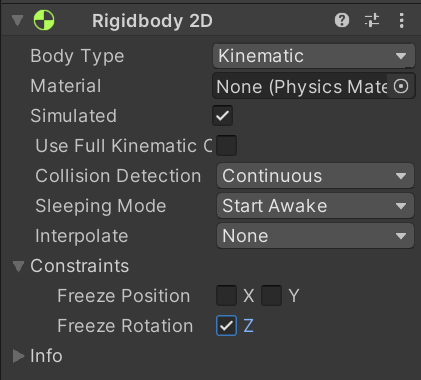
Rigidbody2D
In the Rigidbody2D component we will need to make some changes:
-
Set the body type to Kinematic.
-
Dynamic means it will experience Mass and Forces applied to it by scripts and other objects.
-
Kinematic means it will only have a velocity value that is set through scripts.
-
-
Set collision detection to Continuous.
-
Discrete means it checks for collisions less often which means they may be missed at higher speeds.
-
Continuous check for collisions more often which avoids the clipping effects.
-


SpriteRenderer
In the Sprite Renderer component, we need to:
-
Open the folder section to where the player sprite is located.
-
Then find the player object again and go to its inspector and open Sprite Renderer.
-
Then drag the player sprite into the empty slot in Sprite Renderer.
Currently, the Sprite is not the size it should be and that is because the pixel size Unity thinks it is has not been set.
We can select all the images in the sprite folder and in the inspector, it should show some information about the sprites:
We should:
-
Set the pixels per unit to 16, this can help unity with handling the sprites but is more useful with keeping pixel art images consistent in pixel sizes.
-
Set Filter Mode to Point (no filter) and Compression to none
-
Select Apply
Player Movement Script
Now we will need to create our own component for the player object to control its movements. You can do this in multiple ways, such as clicking to add new component to the player object in the inspector and simply selecting new script, naming it Player Movement or something. You may also right click in a designated folder in the file system below and use the menu to add a new C# Script then name it accordingly.
In this script we will need to set a few variables to use in the Update method which is what will happen each frame. We will need:
public Rigidbody2D Rigidbody <- A reference to the players rigidbody component we can set through the editor
public Vector2 Speed <- A reference to a pair of values x, y we can use to set the speed the player has on each axis
public Vector2 Bounds <- A reference to a pair of values that we will use to limit player movement to the screen bounds
private Vector2 Velocity <- A pair of values we can use to set the velocity of the rigidbody to, since we can't set x or y individually
-
*'public' indicates that it can be viewed and set outside the script while 'private' only allows that within the script*
-
*The word after these is the type of variable being set, such as a number or component or something*
-
*Then the third word represents how that variable can be called in the script*
This can be done outside the methods but within the class definition for Player Movement.
Next, we need to think about how we will handle the logic for the script.
We need:
-
Move the Player on either axis based on Inputs.
-
Stop motion in a certain direction if it will go beyond bounds .
A useful class we can use is the Input class which houses several functions that get inputs from your computer. In this case we can use:
Input.GetAxisRaw(“Horizontal”)
Input.GetAxisRaw(“Vertical”)
This is the getAxisRaw function from the Input class which takes a direction and returns a float number as either -1, 0 or 1 based on WASD key inputs.
For example, W will return 1 for getAxisRaw("Vertical")
Now we need to check if moving in these directions will move us out of bounds, we can use an if statement, which takes a boolean or comparison as an input and runs whatver code is inside it if it is true, like so:
if(transform.position.x + Input.GetAxisRaw("Horizontal") < Bounds.x)
{
    // Do Something
}
else
{
    // Do Something Else
}
However, this will need to work for either direction so taking the absolute value (from the Mathf class) of where the player will be should work like you will see below.
We can put this all together to form the Player Movement Script:
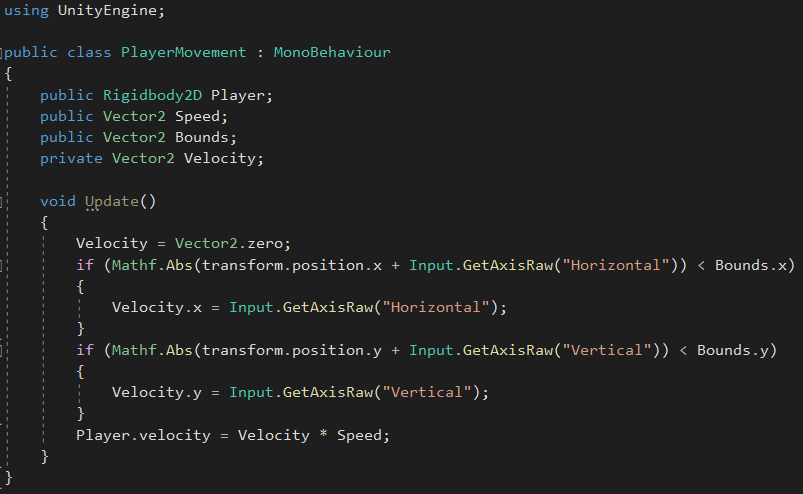
This is a player movement script. It starts each frame with a blank vector and depending on whether the inputs will go out of bounds, sets values to that vector which then is multiplied by a vector representing the speed of the player on each axis and applied to the rigidbody's velocity.
The Laser
What is a spaceship without lasers? First we need to create a new game object in the hierarchy and call it Laser.
Laser Components
Now we need to figure out what components we will need:
-
SpriteRenderer to show its sprite.
-
Rigidbody2D to move it.
Add these components and remember to drag the laser sprite into the sprite slot and set the rigidbody to kinematic and reset the transform.
Laser Movement Script
We should not need that complicated of a script for the Laser. It simply needs to set its velocity on spawn and wait until it is out of bounds then despawn.
To do so we need a reference to a Rigidbody2D, a variable to set the speed and one for the bound as well. Then in the Start method, which is called the first frame an object is active, we can set the velocity to the speed. Finally, we can use the Update method to check, each frame, that the Laser is out of bounds, and if so, destroy it, like so:
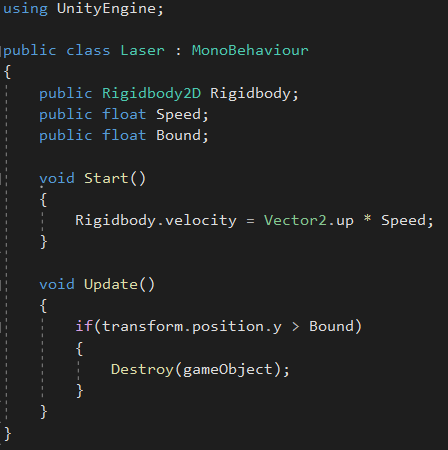
The Vector2 class also houses a few variables that are instances of Vector2's with different values representing directions. For example, the up Vector2 is (0, 1), or up the y axis.
This makes it just a little simpler when setting vectors in directions along an axis, since we want to set the velocity to going up at some speed and now we can just have the speed as a vaiable instead of making a new Vector2 variable.
Player Shooting Script
Now we need to have the Player shoot some lasers! First, we need to turn the Laser object in the scene into a prefab. To do so we just drag the Laser game object from the hierarchy into the file system. Then delete the old object from the scene. Now the Laser will be a prefab!
Next, we can make a new script to add to the Player to shoot lasers, something like PlayerShoot or Shootlaser or something.
There will be some new concepts here. But first we will want to set some variables:
-
public GameObject Laser This is how you reference a prefab from a script*
-
public int CoolDown This is a number we will use to wait some frames to be able to shoot again.
-
private int Timer This will be used to tell if we can shoot again.
So now, we can use the Update method to check each frame, if the Timer is not zero decrease it. And if the space is pressed and the timer is zero, then we can spawn some lasers in front of the player.
To handle the timer we can use a more compact if else statement which is used when you want it to return a value, in this case we can use it to return what number the timer should be subtracted by. It goes like this:
Var -= Var > 0 ? 1 : 0
This is a more optimized line of code than an if statement for specific cases and is structured where before the ? Is the comparison you want then immediately after is what you would return if it is true and after the : is what you would return if it isnt true. And whatever is returned takes place of what is after the =
To get a key press as an input we can use the GetKey function from the Input class:
Input.GetKey(KeyCode.Space)
There are a few variants to the GetKey functions, there is also GetKeyDown and GetKeyUp. Each has its own use:
GetKey() simply returns True when the specified key is pressed on that frame, doesn't matter how long it was pressed before.
GetKeyDown() returns True only for the same frame that key was pressed down.
GetKetUp() returns True only on the frame the specified key was released.
Using GetKey can allow us to have an automatic fire for our laser which is what we will want.
Then to spawn in a prefab using a GameObject variable, we can use the Instantiate function:
Instantiate(Prefab, Vector3, Rotation);
This will spawn the Prefab in the game with coordinates of the Vector3 parameter and rotation of the Rotation parameter.
In the editor make sure the script is added to the player and the laser script is added to the Laser prefab and the variables are filled with numbers that make sense. For example the cooldown could be 20 frames, and the spawn point could be 3, 3 for the laser. And the Laser could have a speed and bound of 50 or something.
Frame Rate
Running the game right now should allow you to move the player about and fire lasers, however you will notice you will be firing very fast. This is due to a frame rate not being set. To do so we can set the Target Frame Rate in a new script called Frame Rate like below:
Now you just need to attach that script to a game object like the Camera (which is always present) and it should be running a lot smoother. Set the rate to something like 60 like most games are. and you can also mess around with the cooldown frames until it feels right.
The Asteroid
Now we need something to shoot at. An Asteroid moving down the screen will do. We can create a new game object in the hierarchy named Asteroid. It will need to move across the screen and interact with the lasers and player. To do so we will need:
Asteroid Components
-
SpriteRenderer
-
Rigidbody2D
-
BoxCollider2D <- This is a new concept, it is a component that can be used to collide with other objects, applying force to them, or just tell if an object overlaps with another.
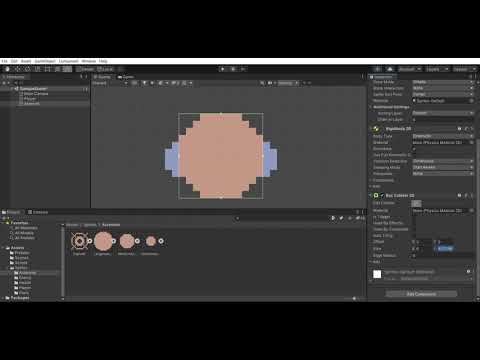
Remember to reset the transform and set an asteroid sprite to the renderer slot and set the rigidbody to kinematic and continuous, and now you also should make sure the bounds for the collider fit the asteroid. Click the triangle shape for the BoxCillder2D component and in the scene view you should see the square it makes up around the object, if not make sure the sizes aren’t 0 for the size of the collider. You can edit these values and drag parts of the square until it feels like a correct hitbox for it. Having the sprite active to get a visual for the size is a good practice.
BoxCollider2D
A collider is a very important component when you want objects to interact with each other. Note that in some cases a rigidbody will be needed for colliders to work if physics are involved. But in this case, we just want the collider so that we can tell if it overlaps with another collider. To do so we can use a method called:
void onTriggerEnter2D(Collider2d collision)
This method has a Collider as a parameter to it because it is called when the collider of the game object overlaps with a different collider and that other collider is the parameter here, so that we may access it if needed. In this method we will want to check that the object collided with is a certain type and destroy itself if so. One way to check this is to look at the tag of that game object. This is a word that we can attach to any game object to differentiate it from others. It is called like so:
gameObject.tag
Reworking Laser Logic
Now we can put these concepts together and form a script. However, if you think about what this object will be doing and compare it to the Laser, it will be very similar except for direction. We can just edit the Laser script and generalize it, so we should be able to set the speed to be negative and still have the bound logic work. A simple absolute value of the position should work for that comparison.
Mathf.Abs(Number)
Even though the asteroid will be moving down to say -60 at -15 speed, its position can be treated as positive, and the bounds will be positive just in the comparison. This will work for both the Laser and Asteroid. And we will also just need a string variable that will be the tag that will be checked for to destroy the game object.
So now we can apply these changes and add the collider logic to the Laser script like below:
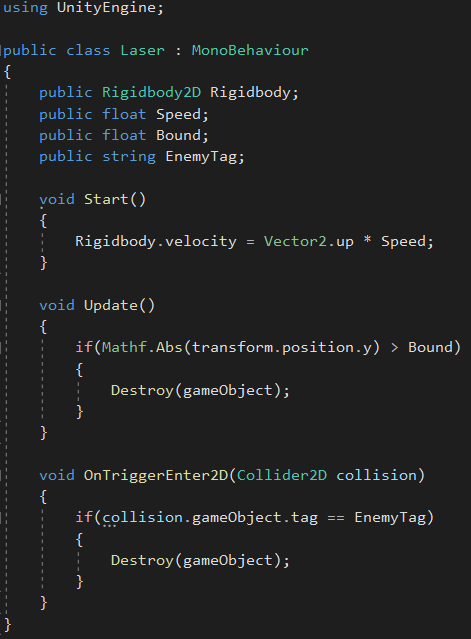
And remember to add a box collider to the Laser prefab too, now that it should have one.
And you should also go into the inspector for the laser and asteroid and click on the tag button up top, this will drop down a menu where you can add and set tags. You will want to add a Laser and Asteroid tag to use for the respective objects for now.
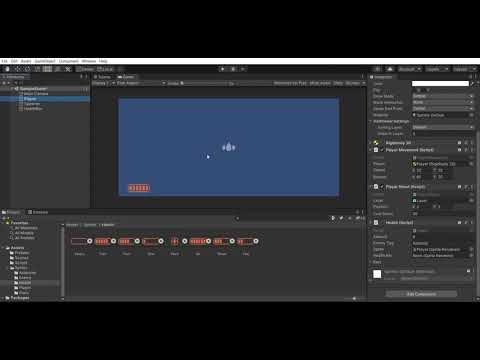
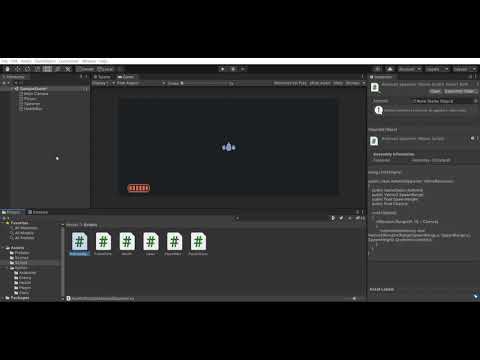
Asteroid Spawning

Now that we have the asteroid concept done, we will need to make a way to spawn many of them randomly.
Spawner Object
We can create a new empty object in the hierarchy but this time we won't need to add any components to it. We can just have it exist and use it to run a script.
Spawner Script
We can make a new script and call it spawner or something and now we will need to figure out some logic for it. We need to make the asteroid into a prefab like we did with the laser to use as a reference, and to spawn it in we will want some range of values to spawn it into since it should be randomly around the screen, which also means we will need a number to use as a chance to spawn it too.
public GameObject Asteroid;
public Vector2 Rangepublic float Height
Random.Range(-10, 10) returns a random integer from -10 to 10 while being < 10
So, each frame we can check if a random number for some range we decide is less than the chance we want and if it passes then spawn an asteroid above the screen with a random x coordinate in the range, we give it, like so:
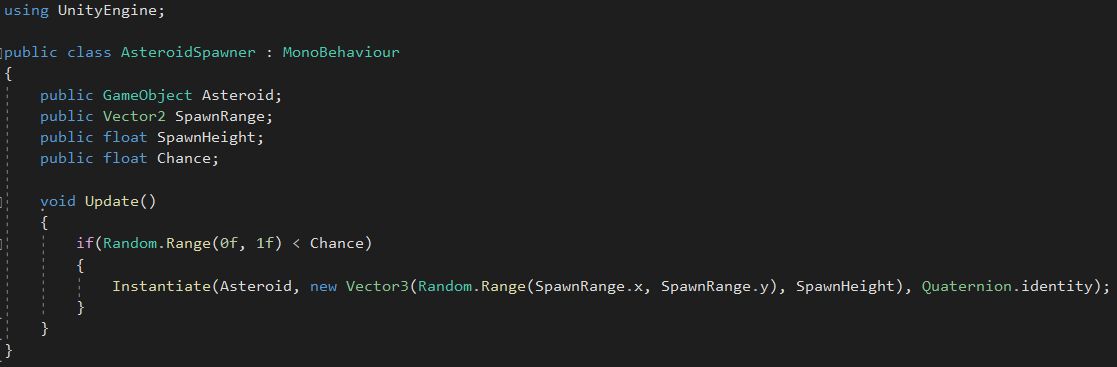
Here we can use the range as the bounds of the player and the chance could be something like 0.05 to start but could be changed until a good spawning rate is achieved through testing. This would mean each frame has a 5 percent chance to spawn an asteroid, and that over 60 frames means about 3 asteroids per second.
Health System
Now that the lasers and asteroids can spawn and interact with each other, the next step is to let the player object do the same. We will introduce a health system to use for the player.
Health Script
So, we should have a number to represent that amount of health we have and we can take some away every time the player collides with an asteroid, and as most retro games do, we can make the player immune for a small damage animation. We already know how to deal with collisions, but we will need a new concept to handle the immunity and damage animation. This will be the IEnumerator method, a function from the System.Collections library we can make a reference to. These are functions we can write that will run alongside your scripts, unaffected by framerates. It appears similar to how other functions or methods are defined, like so:
IEnumerator Take_Damage()
StartCoroutine(TakeDamage())
In this function we can make the player immune, flash the sprite on and off, then make the player not immune. To do this we will need a way to disable the sprite, like so:
SpriteRenderer Sprite
Sprite.enabled = false
You can set the enabled variable of a SpriteRenderer to true or false to turn it on or off. And then to add some time between the flashes we will need a way to wait some time, like so:
yield return new WaitForSeconds(numSeconds)
This line will cause the now branched function to wait the number of seconds given in the parenthesis, which could even be a decimal number. In a regular update function you would not be able to wait to continue executing code. We could loop these concepts a few times to get the flashing effect we want. A for loop will do. This sets a variable and it can increment it until it reaches a limit, which is useful for looping a set number of times. It looks like this:
for(int i = 0; i < MaxNumber; i++)
This sets a new variable ‘i’ to zero and increments it by 1 (i++) and runs whatever code is inside it until ‘i’ does not satisfy the conditional (i < MaxNUmber) in the middle. This can cause us to run the code inside the for loop a certain number of times.
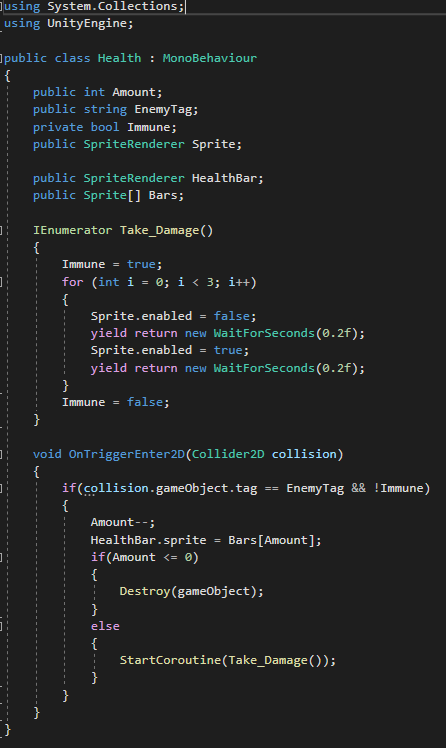
Putting all these concepts together we can form the Health script for the player like so:

Health Bar
Now that the player has a health value, we can set a visual on screen to show it. This will simply be a Sprite on screen that has its image changed each time the player's health is updated. To do this we can add two variables to the health script, a SpriteRenderer that is a reference to the sprite on screen, and an array of Sprite images we can swap to. An array is like a list of elements with a fixed size, and you can access each member of that list through an index. It appears like so:
public int[ ] Numbers *This is an unset variable that references an array of integers.*
int Variable = Numbers[3] *This is how you can call a certain element from the array.*
We can set a public array through the editor so no need to worry about initializing it through the script. There are cases where that would happen and in those cases there are functions that can find certain objects or components and returns an array you can use to set it.
So now that we can use an array of Sprites that contain health bars that relate to different levels of health, we can figure out a clever way to index it such that we can use the health as an index. This means that since the amount of bar variations or the length of the array should be equal to how much health the player has, we can use the health amount as a way to access the health bar associated with the amount. For example if health is 0, then we can use the sprite at 0 index in the array, and with health 1 we can sue index 1, etc. To make an array of sprites we can just do this:
public Sprite[ ] Sprites
With this logic, whenever the player health is updated, we can just set the health bar sprite to whatever sprite is at the index in the array of the new health amount, as seen in the updated health script:
Exporting
Before exporting it is a good idea to add a line of code to a script that is always active that will let you quit out of the game without having to manually close the application. We can use this line of code in an update function, probably the frame rate one:
If (Input.GetKeyDown(KeyCode.Escape)) Application.Quit();
There is much more you could do to add to this game, or any game, but eventually you are going to want to make a build for it whether it is finished or not, to see what the finished product would look like at this moment, or to save a previous copy of a game you may be updating. To build your game, or export the application into a file, you can go into the menu through file and click build settings.
Here you will see the scenes the game thinks it should export and how Unity will export it, such as how it will be windowed or what platform it will be for. If the scene you want is not in the build, make sure to click 'add open scenes' and then click build. This should then work on exporting your game into your computer's file system that you can play outside of Unity.
Additional Content for Visual Appeal, not Needed for Gameplay:
Stars in Background
Camera Shake
C# Concepts Covered
-
Variables, Classes and Methods
-
Sprite Renderer / Sprites
-
Rigidbody Physics
-
Vectors
-
Input
-
Conditionals
-
Spawning Prefabs
-
Collisions
-
Random Numbers
-
IEnumerators
-
For Loops
-
Arrays
Unity Concepts Covered
-
2D Game Development
-
Editor Layout
-
Components
-
Positioning
-
Testing Game
-
Building/Exporting Game